
Disclaimers at the bottom of main page apply here too.
07/17/2025 - Discover the Beauty of Landscapes with This Photo Scavenger Hunt - CLICK HERE07/17/2025 - PHOTO CHALLENGE CARDS - 12 cards to help inspire you, challenge your creativity, and give you a little push to take more photos. CLICK HERE.
02/02/2025 - Photographing Snow: When photographing snow, you might consider slightly over exposing to avoid a bluish tint. You can do this using Exposure Compensation or put the camera in Manual Mode and either slowing the shutter or increasing ISO to move the light meter to a + 1/3 stop.
07/05/2024 - Burst Capability. Member Larry Heine has provided an example of the coolness of using the burst capability of your camera to capture moving objects. CLICK HERE.
05/27/2024 - Soap bubble photography - Add a drop of dish soap to the oil and water to make oil bubbles smaller and more clearly defined. Bubbles seem to have a thin black border.


03/14/2024 - How to do Surreal Digital Infrared Photography Without Expensive Gear or Camera Conversions. CLICK HERE.
07/13/2023 - Discussion on camera sensors. CLICK HERE.
04/27/2023- 8 Tips for Beautiful On-Camera Flash Photography - CLICK HERE
04/05/2023 - How big can you print:

11/19/2022 - Here is a nice article about using external flash equipment. CLICK HERE.
11/05/2022 - How to photograph fireworks. An interesting article on how to photograph fireworks. CLICK HERE.
25 Common Photography Abbreviations, Explained. Another article defining abbreviations. CLICK HERE.
25 Common Photography Abbreviations, Explained. Another article defining abbreviations. CLICK HERE.
10/06/2022 - Rembrandt Lighting Technique: A dramatic portrait lighting technique executed using a single light source and minimal setup. Here is a video that explains this technique: CLICK HERE
08/16/2022 - Composition technique that will change your approach to photography by using layers. 14 minute Video - CLICK HERE
07/01/2022 - Canon photography site explaining how to take photos of fireworks. CLICK HERE
01/06/2022 - Cold Weather Photography - Here is an excellent short article about photographing in cold weather. CLICK HERE.
11/28/2021 - Adobe Lightroom Academy - Free photography classes on various photography topics. CLICK HERE.
11/13/2021 - Have you ever heard of the Dutch Angle Shot? The Dutch angle, also known as Dutch tilt, canted angle, or oblique angle, involves setting the camera at an angle
on its roll axis so that the shot is composed with vertical lines at an
angle to the side of the frame, or so that the horizon line of the shot
is not parallel with the bottom of the camera frame. For example:

11/04/2021 - How to use a Gray Card - Here is a link to an article about using a gray card get the right white balance. CLICK HERE.
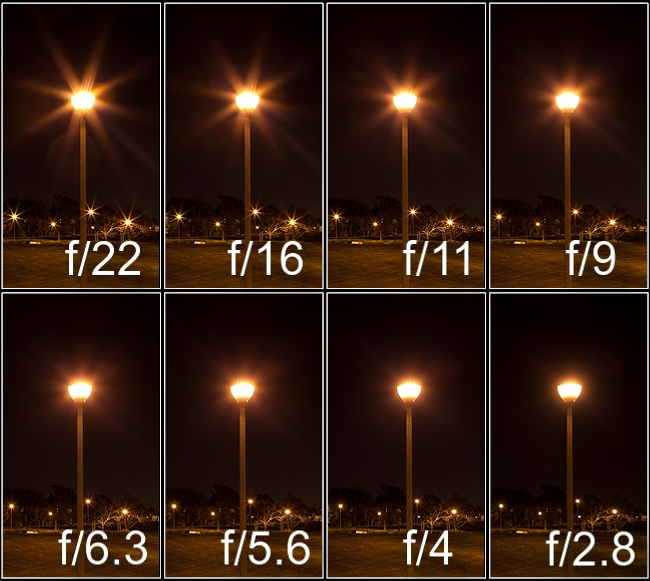
09/05/2021 - A small aperture such as f/11, f/16, or f/22
can produce an attractive burst; the smaller the aperture
the better the effect, although you may want to avoid extreme apertures
such as f/16 or f/22 because of diffraction. This works for day or night photography.
08/11/2021 - Controlling Depth of Field - Canon video on aperture and controling depth of field. CLICK HERE.
08/09/2021 - Guide to Photography Composition with 22 Photography Composition Rules, Principles & Elements - CLICK HERE.
06/18/2021 - Lenstag - A service to help you if your equipment and photos are stolen. If your gear goes missing, using Lenstag greatly increases the chances you'll get it back. This is a free service although they have a premium service for a fee. CLICK HERE.
06/04/2021 - Rule of Thirds - Here is a nice article on the topic of rule of thirds. CLICK HERE.
05/29/2021 - Here is a short video explaining the Histogram. Note that near the end, instructor advises that the final decision should be made by the photographer. CLICK HERE.
Here is another link to a whole list of videos on photograph from Canon. CLICK HERE.
05/06/2021 - NIKON's new NX Studio software. A free download which include managing Nikon RAW photos. Here is a recent review: CLICK HERE.
04/10/2021 - List of Photography Terminology: A Glossary of 69 Essential Photographic Terms - CLICK HERE.
02/18/2021 - Dos and Don'ts for photographing the moon. This article has some really good suggestions on capturing the moon. CLICK HERE.
01/15/2021 - Understanding all the Different Image File Formats - Here is a nice article explaining the different file formats for photographs. CLICK HERE.
12/03/2020 - Tips when posing people. The following web site has several good videos on how to pose a person for a photograph. CLICK HERE.
(11/26/2020) 8 Tips to minimize your memory card. CLICK HERE.
(11/21/2020) Flash Photography. A member has recommended the following web site for information on flash photography. CLICK HERE.
(11/16/2020) Camera Copyright Info. - Some cameras allow you to have copyright information inserted into your photo file. If you are selling a camera, or perhaps you rented a camera, you’ll
probably want your copyright information fully removed from the camera.
How to fully delete your owner and IPTC info from the camera:
- Delete both the owner and IPTC info with EOS Utility.
- Go to the camera menu option to add your copyright information.
- Fill the author and copyright fields with either spaces or random characters.
- In the camera menu, now delete the copyright information.
(11/12/2020) Dare to be Different - An article about learning to take a different photo than what others would take. CLICK HERE.
(10/29/2020) Night sky photography lesson. CLICK HERE.
(07/04/2020) Want to take photos of fireworks? Here is a short tutorial video. CLICK HERE.
(05/28/2020) Memory Card advice. CLICK HERE.
(05/21/2020) Here is an interesting article entitled, "9 Acceptable Ways For Breaking Rule of Thirds in Photography" CLICK HERE.
(05/16/2020) 10 Great At-Home Creative Photography Ideas: CLICK HERE
(05/09/2020) 15 Tips in less than 10 minutes. CLICK HERE.
(04/28/2020) SD Cards: In looking for an SD card for photography, the following should be good enough: Class 10, UHS-I, or U1 card. They can handle RAW digital images and 1080p video. Shooting 4K video may require an SD card with a U3 rating. Here is an article explaining SD cards and the symbols on the card. CLICK HERE.
(04/12/2020) Canon Web site: Composition: It's All in How You See It. CLICK HERE
(04/11/2020) Creative Abstract Photography with Food Coloring and Milk - CLICK HERE
While we're stuck at home, here is some fun photography ideas.
ITEM (03/05/2020) Why ISO has nothing to do with exposure. The following video provides an interesting explanation as to why ISO is not about exposure. CLICK HERE.
ITEM (02/14/2020) Mirror verses Mirrorless cameras. So your considering upgrading your camera. Here is a good article comparing the pros and cons between DSLRs (mirror) and Mirrorless cameras. CLICK HERE
ITEM (01/11/2020) Back Button Focusing: You can assign a button on your camera to manage the focusing of your subject and use the shutter button just for metering and taking the photo. To see an explanation, CLICK HERE. Although the video is for Canon, most mid- and high-level cameras have this feature.
ITEM (12/15/2019) COPYRIGHTING PHOTOS: Here is a link regarding copyrighting photos. Some changes have been made since 2018. CLICK HERE
ITEM (10/11/2019) When using Live View: Remember that the brightness or darkness you see on the screen is set for the screen, not necessarily for the final photo. Look at your built in light meter to ensure the exposure is correct.
ITEM (08/27/2019) Perspective: Here is a video of our galaxy from a different perspective. Just a reminder for us to rethink when photographing something. Try something different. CLICK HERE.
ITEM (06/27/2019) - Why you should avoid small apertures, e.g., F14 to F40. CLICK HERE.
ITEM (04/28/2019) Reasons for printing photos - Interesting article about why you should print on paper your photos (not necessarily all of them but the keepers.) CLICK HERE
ITEM (04/04/2019) Camera's light meter: An advantage to using the “Manual” mode in photography is the light meter within your camera. When shooting in any other mode, e.g., shutter or aperture priority, the light meter will almost always center itself because the camera will change the shutter, aperture, or ISO setting to ensure an even exposure. But when shooting in Manual, it varies depending on the shutter, aperture, and/or ISO settings. The following photo shows how exposure changes at different aperture settings = 16, 11, and 22.
 When shooting in Manual, the photographer decides what setting to use to adjust for an even exposure. It is another reason why beginning photographers should first master the manual mode to understand what will happen when using other modes.
ITEM (03/28/2019) Setting external flash to Manual. The following article describes the advantages of setting your external flash to manual. CLICK HERE.
ITEM (02/21/2019) Depth of Field Preview Button - Most DSLRs have a Depth of Field Preview button. Here is a link to a video that explains who it works. CLICK HERE.
ITEM (02/07/2019) Photo Contests. Here is an interesting article entitled 8 Great Reasons to enter a Photo Contest. With photo contests and gallery shows beginning another season, you'll find this article relevant. CLICK HERE.
ITEM (01/23/2019) Perspective. Here is an article that discusses basic perspective approaches to photography. CLICK HERE.
ITEM (01/17/2019) Avoiding blurry photos. Here is an article with suggestions on how to avoid blurry photos. CLICK HERE.
ITEM (12/30/2018) Copyrighting photo - This is a reminder to change any copyright messages that your camera might insert in the photo data, e.g., © 2019. If you have a photo web site, you'll want to update your copyright date there too.
ITEM (12/21/2018) How to deliver digital images to your clients. CLICK HERE
ITEM (11/04/2018) How to take better winter landscape photos. CLICK HERE.
ITEM (10/02/2018) What is EXIF Data? This is data filed in each photo containing the camera settings. Here is an article that explains it in detail. CLICK HERE.
ITEM (09/06/2018) - External light meter vs in camera meter. Here is an interesting explanation of the difference. CLICK HERE.
ITEM (09/04/2018) Want to take clear night photos of stars? Try following the rule of 500. CLICK HERE.
ITEM (08/16/2018) 7 Powerful Photography Tips video. CLICK HERE.
ITEM (07/27/2018) Viewfinder Image Blurry? You May
Need to Adjust Your Camera’s Diopter – Here’s How - CLICK HERE.
ITEM (06/28/2918) 23 Common Photography Abbreviations: Test your knowledge and see how many you know. CLICK HERE
ITEM (06/14/2018) How to photograph lightning. Two videos giving "how to do it" tips. CLICK HERE.
ITEM (06/09/2018) Explanation of depth-of-field. Video from B&H Photography explaining different approaches to depth-of-field. CLICK HERE.
ITEM (05/31/2018) Tips for using on-board and attached flash. CLICK HERE.
ITEM (05/31/2018) Pricing your photos. Here is an article discussing ways to determine how much to charge. CLICK HERE.
ITEM (05/31/2018) Posing Subject: This link provides 21 suggestions when posing a person for a photograph. CLICK HERE.
ITEM (05/12/2018 - Consent in Photography. Here are several links discussing the subject of your rights to photograph people.
Consenting - CLICK HERE
Legal Opinion - CLICK HERE
Legal Handbook for Photographers: The Rights and Liabilities of Making and Selling Images. Available on Amazon in book and Kindle format: CLICK HERE.
ITEM (04/20/2018) 20 Essential Photography Tips. We received an email from Tess Pajaron, Outreach Manager, Bob Books Ltd, London, England, providing a link to an article on their blog sites for beginner photographers. A lot of good advise. CLICK HERE.
ITEM (03/24/2018 - In the first photo, the contrast and sharpen sliders were pushed to an extreme. It looks like a photo of a galaxy. The second photo is the original photo. Experiment with your software for cool effects.

 ITEM (03/15/2018) How to Know if Your Photo is Good or Not – The Art of Self Image Critique CLICK HERE.
ITEM (03/08/2018) Raw Vs. JPEG. The following article discusses the pluses and minuses of shooting Raw or JPEG files. CLICK HERE.
ITEM (03/01/2018)
ITEM: Here is an overview concerning tripods.
CLICK HERE At the January 2018 meeting, a discussion will include travel tripods. And as a reminder, if the camera is attached to the tripod, DON'T allow the legs to slide down freely and slam fully extended. Why? If they slam hard when extending, the impact may travel back to the camera and destroy the sensor - this happened to a member several years ago.
ITEM (12/21/2017) In preparation for our January and February meetings concerning HDR (High Dynamic Range), here is some important information.Bracketing captures three levels of exposure (three photos). Using software, all three photos can be combined to provide the best exposed. But most members don’t have the software to combine the three into one good exposure. So, here is a list of free and for a fee HDR software
This video gets a bit complicated but you'll get the idea about bracketing: CLICK HERE.
ITEM (11/23/2017) Here is a refresher course for the Five Most Essential Camera Settings and How to Use Them. CLICK HERE.
ITEM (11/16/2017) How to shoot in manual mode. Here is an article with some helpful hints when trying to shoot in the manual mode. CLICK HERE.
Here is a second article which simply states that photography is a people business. That is, photography has a lot to do with how we interact with people. CLICK HERE.
ITEM (10/05/2017) Improve Your Street Photography article. Nice advice and in particular is item 5 which I never considered before but is great advice.
ITEM (09/25/2017) How to take high-speed photos without a high-speed camera. CLICK HERE.
ITEM (09/16/2017) Tips for Minimalist Photography- An article regarding mimimalist photos and negative space.
CLICK HERE
ITEM (08/26/2017) 7 hidden iPhone features.
CLICK HERE.
ITEM (08/23/2017) Aspect Ratio - Most cameras have a feature where you can set the size of your photo at the time you take your photo. Typical ratios are 4/3, 3/2, 1/1, 16/9, etc. In the day of film cameras, these ratios were used based upon the size print you wanted. For example,
Print Size Aspect Ratio
4x6 3:2
5x7 7:5
8x10 5:4
20x30 3:2
Today, internet consensus suggests that you set your camera to the ratio that captures the most of the picture and then later, using your computer, crop the photo to capture the story you want to tell. One camera might work best with a 3:2 ratio whereas another camera might capture more with a 4/3 ratio.
So, which aspect ratio in your camera captures the largest area? You need to experiment by placing your camera in one location and take a photo of the same scene for each aspect ratio provided by your camera. Then review the photos to see which ratio captures the most territory.
ITEM (08/16/2017) Free RAW/JPEG photo processing software packages. The following video reviews Photoscape X and Raw Therapee. CLICK HERE. For those who want to manage their Raw files without the expensive of buying software, these free packages might be a good alternative. No one fro our club has tested the software so you might want to conduct additional research into these packages before downloading them.
If you want a tutorial on Raw Therapee, CLICK HERE.
ITEM (08/23/2017) Have you ever put a filter on your lens and discovered you can't get if off? See Adam Savage try to remove a camera lens filter (using a band saw.) CLICK HERE.
ITEM (08/03/2017) PhotoShop Users: Adobe has launched a new Photoshop tutorial series for beginners on its YouTube channel, titled "3, 2, 1... Photoshop!" CLICK HERE.
ITEM (08/02/2017) Things to Consider Regarding a Mirrorless System. CLICK HERE.
ITEM (07/26/2017) Should you use a protective filter? A discussion on whether you should have a protective filter on your lens or not. CLICK HERE.
ITEM (07/25/2017) Free video series on basic Photoshop. This Youtube series consists of 33 videos explaining the basic applications in Photoshop.
CLICK HERE.
ITEM (07/13/2017) Adding text into the photo file. Did you know that you can add text inside your photo file that provides information you want to keep with the photo for future reference, e.g., who is in the photo or where you took the photo. For general instructions, CLICK HERE.
Here is an example of a photo in a Mac computer. Highlight the photo file with the right mouse button and click on "Get Info". Scroll down to comments and add text.

ITEM (07/11/2017) Photographing an eclipse. Here is an article providing tips on photographing the upcoming solar eclipse. CLICK HERE.
ITEM (07/06/2017) How to sell your photos: The following article discusses how one photographer earns money by selling his photos. CLICK HERE.
ITEM (07/05/2017) - 10 Important Tips for Purchasing a Used Camera. CLICK HERE.
ITEM (06/29/2017) Video showing 10 Photography tricks.
Click Here.
ITEM (06/15/2017) Your cell phone can help with night photography. Here is an article that provides some tips on using your smart phone's flash light to enhance night photography. CLICK HERE.
ITEM (05/29/2017) Here is a video describing the positive and negative issues when using a polarizing filter. CLICK HERE
03/29/2017 - "When Learning to Shoot in Black and White, You Can’t Just Guess." This is a good article when considering photographing in black and white. CLICK HERE.
03/12/2017 - Lens Diffraction In Photography - Here is a nice video explaining the problems when you set a small aperture size, e.g., F-22 and the way it affects the sharpness of your photo. CLICK HERE.
03/02/2017 - A Photographer’s Shutter Speed Cheat Sheet as a Handy Reference.This article also provides advice regarding the balance between shutter speed and exposure.
CLICK HERE
02/23/2017 - Getting Sharper Photos - Here are 4 tips on getting sharper photos. Suggestions 1 through 3 are common sense ideas. The 4th suggestion will take some effort but in the long-run, may help a lot. CLICK HERE.
02/10/2017 - Light Meter. Here is a link to a Youtube video explaining the light metering modes that most cameras have. Choosing the right mode can help get the shot you want where lighting conditions have sharp contrasts. CLICK HERE.
Here is an article from B&H Photo - CLICK HERE.
02/09/2017 Nikon Camera Owners - Nikon has a series of classes available around the country. They will be holding a class in Chantilly, VA March 11. For online Nikon classes, CLICK HERE.
For Sony cameras CLICK HERE.
Olympus Cameras: CLICK HERE.
02/09/2017 5 Tips to get sharp photos using tripod. CLICK HERE.
01/08/2017 - How to use exposure compensation: Here is an interesting article on how exposure compensation works and what it does in different camera settings. Click Here.
12/17/2016 - Painting with Light.
Set up your camera on a tripod, set the shutter for around 20 seconds, F22, ISO 100 and manual focus (and focus on the person holding the light), and have one of your kids wave a light to make different shapes. Here is an example:
 For more examples, CLICK HERE.
12/11/2016 - Easy way to grasp the concept of the F-Stop.
At the November club meeting, Joe Laughland discussed the F-stop (a measurement of the size opening of the aperture). He explained that if you think of the F-stop number as a fraction or a part of a delicious cherry pie, it is easier to understand. E.g, The number 1 represents the largest potential opening (the entire pie). The F-stop number is a fraction of 1. E.g., F1.4 would be 1/14 of the pie. F-22 would be 1/220 of the pie (obviously a lot less pie - or in our case, a lot less light getting to the sensor.) As you change your F-stop, you'll be getting either more or less of the pie (light). So, think of the F-stop as a fraction of 1.
11/20/2016 - Visual Chart - The following chart should help beginning photographers in understanding shutter, aperture, and ISO. As the F-stop number increases, the depth of field (what is in focus in front and behind the subject) increases. As the shutter slows down, the subject becomes more blurred. When the ISO number increases, the photo will become more grainy.

11/15/2016 -Micro adjusting your lens to your camera.Most mid- and high-level cameras have in-camera adjustments to ensure that the lens will correctly focus on your subject. In general, you focus on an object with fine detail and take a photo. If it appears that the foreground and background is in focus rather than the targeted subject, then you may need to adjust the lens using the in-camera application.
The following are links for several different manufactures and a list of cameras that should have in-camera adjustment ability.
Canon - CLICK HERE
Video that explains this process: CLICK HERE
Canon: AF MicroAdjustment
1Dx, 1Dx Mk2, 5D Mk3, 5D Mk4, 5Ds, 5Ds R, 6D, 7D MkII, 1D Mk3, 1D Mk4, 1Ds Mk3, 5D Mk2, 7D, 50D, 70D, 80D
Nikon (AF Fine Tune)
D4, D4s, D5, D3, D3x, D3s, D300, D300s, D500, D600, D610, D700, D750, D800 (/E), D810, D7000, D7100, D7200,
Sony: AF Micro Adjustment
A900, A850, A6000, SLT-A77, SLT-A77 MkII, SLT-99
Olympus: AF Focus Adjust
Note: Olympus cameras facilitate independant adjustment of the short and long end of zoom lenses.
E-30, E-620, E-5, E-M1 (only when used with 4/3 lens adapter)
Pentax: AF Fine Adjustment
K20D, K2000, K200D, K-3 series, K-5, K-5 II, K-5 IIs, K7D, 645D, 645Z
11/10/2016 Backlighting.
Backlight is essentially what it sounds like: light that comes from behind the subject. It is primarily light that is directed toward the camera's position, but blocked by the subject. This creates a glow that is variable for the subject. Backlight can be created artificially with a studio or light kit, and can also be harnessed in a natural environment by positioning the subject in relation to natural light sources. You are likely going to want to use a reflected light meter in these situations.
Backlighting Tips
You are going to have to go with your instincts usually when trying to position the backlight effectively. For example, a natural light source like a window can be useful if it is not too large. If it is too large then you will end up seeing that the brightness of an open window source can blow out the image if it stays in the frame.
When outside you will usually want the subject to block the sun directly. This way it will be an effective backlight while also keeping the sun out of the subject’s eyes. If it is really bright then you may want to avoid this and instead go for using a reflector both on the spot and the backlight.
Here are two short videos that give some great tips on creating backlit photos:
CLICK HERE #1
CLICK HERE #2
CLICK HERE #3
10/28/2016 - Here is a link to a thorough discussion on street photography. Here is an outline of the discussion:
10/19/2016 - Here is a link with suggestions for taking photos of the fall colors. One tip that seems to work all the time is to slightly underexpose. CLICK HERE.
10/15/2016 - DSLR or Mirrorless? Which Camera Is Right for You? Here is a video that explains the difference.
10/11/2016 - How To Take Pictures Of Mist And Fog - CLICK HERE.
09/18/2016 - How lenses work - A short Canon video that explains lenses. CLICK HERE
08/02/2016 - Photo Quiz. Here is a link to a 22 question quiz which can challenge both new and experienced photographers. See how you do. CLICK HERE.
07/21/2016 - 5 Tips for Setting the Focus in Your Landscape Photography. This is an interesting article that's worth reading. CLICK HERE.
07/07/2016 Multiple Exposures. Some new cameras now provide the ability to make multiple exposures within the camera. The following comes from a Canon 80D. You can take up to 9 shots. After each shot, the Lego car is moved forward. After taking the shots, the camera stitches the photos together. This allows some trick photography. The Lego Photo is a combination of 6 shots.
 Here is another example of multiple shots (3 shots). So, when looking at upgrading your camera, you might want to consider this feature. Yes, it is a scary photo so please don't show it to your kids. In both shots, a tripod was used.
 06/29/2016 A guide to photograph the Upper Antelope Canyon. This article provides some interesting suggestions in photographing narrow cannons. To read the article, CLICK HERE. Also note near the end that commercial photography on Navajo Reservations require a permit. When filming any private park area, first check out the park's photography regulations.
6/02/2016 - Camera Settings: Remember to reset your camera settings after each photo event. Return the settings to something that is neutral. E.g., if you had been shooting an ISO of 2,000, return it to 100. If you had an aperture of F22, return it to around F5. Return your shutter speed from the 2,500 to around 100. And finally, reset your White Balance to auto.
WHY? When you grab your camera next time for a quick shot, the settings won't be so extreme as to make the photo worthless.
5/20/2016 - Improving sharpness. We all know the techniques to improve sharpness: Image stabilization, tripod, faster shutter speed, and using the lowest ISO setting as possible. Another way to improve sharpness (by avoiding shake) is to set up your camera for the shot and then use the "live view" feature where you see the subject using the LCD screen rather than the view finder. This feature locks the mirror up and out of the way and avoids shaking caused by the mirror lifting out of the way.
5/19/2016 - What is HDR? Wonder what exactly is HDR (high dynamic range). To find out, read this article - CLICK HERE.
4/19/2016 - Dirty Sensor. The other day, I took photos of the sky and a jet trail but found some small spots on the photo. I switched lenses and found that the spots still appeared on my photos which indicated that my sensor was dirty. Although sensor cleaning kits are available on the Internet from $35 to $50, I took my camera (Canon 60D) to Glen's Fair Price Store (Website) for cleaning - it cost $25. This is probably the most economical way of refreshing a DSLR. So, check out your photos and see if your sensor is dirty. Joe Laughland
The arrows are pointing to some of the obvious spots that were on my sensor. Can you see some of the other spots?

3/31/2016 - 5 Uncomfortable Truths About Photography. Here is an interesting article that you might find educational. CLICK HERE
03/03/2016 - Memory Cards - Information you need about memory cards - They are not all equal. CLICK HERE.
02/13/2016 - How the Focussing System on Your Camera Works. CLICK HERE.
02/03/2016 - 4 Things To Consider Before Uploading Photos Online. CLICK HERE to read an interesting article on this topic.
01/27/2016 - Do you know what the Acronyms and Markings on Your Camera Lens Mean? CLICK HERE to see explanations.
01/22/2016 - Photographing Snow - We're expecting 2+ feet of snow this weekend so let's get out there and capture snow scenes. 1. Set ISO at 100-200
2. Set white balance on shade.
3. Exposure compensation should be set at +1 or +1.3
Here are links to web sites and videos that provide tips on snow photography.
* CLICK HERE
* CLICK HERE
* CLICK HERE
Videos
* CLICK HERE
* CLICK HERE
There are tons of other sites and videos on the web.
01/21/2016 - Using a Grey Card to get the right white balance. Here is an article about using the grey card to set your white balance. CLICK HERE.
01/19/2016 - ISO - A Beginners Guide. For a basic explanation of ISO, CLICK HERE.
01/14/2016 - Histograms for Beginners. An article found at
Digital Photography School. Click Here.
12/22/2015 - Holiday Photos Checklist - Contains a list of actions in preparing for those holiday photo opportunities. CLICK HERE.
12/14/2015 - Sunrise and Sunset Forecast models you can use to see if there will be a beautiful sunrise or sunset you your area. CLICK HERE.
Updated: 12/11/2015 Check List - Before you leave home for your next photo shoot, you want to reset your menus to something neutral. Here is a list of the most common settings that you should check.
 UPDATE = Visit this site and the discussions that follow regarding check lists and preparing your equipment. CLICK HERE.
11/24/2015 - Memory Cards.
Visit the following web site for an explanation on memory cards for your camera. CLICK HERE. One important point - some of the newer cards may not work on older cameras. Look at your manual to see what it recommends.
 11/16/2015 - How a DSLR Shutter Works.
Click on the following link to see an interesting video explaining the shutter function. CLICK HERE.
11/06/2015 - Copyright Issues
You know that by photographing something, you automatically have the copyright. What you may not know is that if you don’t register your copyright with the copyright office, you can’t
Here is a link to a B&H video on copyright issues for photographers. Although it a long video (one hour and 35 minutes) you should view the entire video. CLICK HERE.
To visit the Copyright office, CLICK HERE.
For a PDF tutorial on registering electronically, CLICK HERE.
11/05/2015 - An interesting short Canon video and what it says about the photographer.
(05/16/2020) 10 Great At-Home Creative Photography Ideas: CLICK HERE
(05/09/2020) 15 Tips in less than 10 minutes. CLICK HERE.
(04/28/2020) SD Cards: In looking for an SD card for photography, the following should be good enough: Class 10, UHS-I, or U1 card. They can handle RAW digital images and 1080p video. Shooting 4K video may require an SD card with a U3 rating. Here is an article explaining SD cards and the symbols on the card. CLICK HERE.
(04/12/2020) Canon Web site: Composition: It's All in How You See It. CLICK HERE
(04/11/2020) Creative Abstract Photography with Food Coloring and Milk - CLICK HERE
While we're stuck at home, here is some fun photography ideas.
ITEM (03/05/2020) Why ISO has nothing to do with exposure. The following video provides an interesting explanation as to why ISO is not about exposure. CLICK HERE.
ITEM (02/14/2020) Mirror verses Mirrorless cameras. So your considering upgrading your camera. Here is a good article comparing the pros and cons between DSLRs (mirror) and Mirrorless cameras. CLICK HERE
ITEM (01/11/2020) Back Button Focusing: You can assign a button on your camera to manage the focusing of your subject and use the shutter button just for metering and taking the photo. To see an explanation, CLICK HERE. Although the video is for Canon, most mid- and high-level cameras have this feature.
ITEM (12/15/2019) COPYRIGHTING PHOTOS: Here is a link regarding copyrighting photos. Some changes have been made since 2018. CLICK HERE
ITEM (10/11/2019) When using Live View: Remember that the brightness or darkness you see on the screen is set for the screen, not necessarily for the final photo. Look at your built in light meter to ensure the exposure is correct.
ITEM (08/27/2019) Perspective: Here is a video of our galaxy from a different perspective. Just a reminder for us to rethink when photographing something. Try something different. CLICK HERE.
ITEM (06/27/2019) - Why you should avoid small apertures, e.g., F14 to F40. CLICK HERE.
ITEM (04/28/2019) Reasons for printing photos - Interesting article about why you should print on paper your photos (not necessarily all of them but the keepers.) CLICK HERE
ITEM (04/04/2019) Camera's light meter: An advantage to using the “Manual” mode in photography is the light meter within your camera. When shooting in any other mode, e.g., shutter or aperture priority, the light meter will almost always center itself because the camera will change the shutter, aperture, or ISO setting to ensure an even exposure. But when shooting in Manual, it varies depending on the shutter, aperture, and/or ISO settings. The following photo shows how exposure changes at different aperture settings = 16, 11, and 22.

ITEM (03/28/2019) Setting external flash to Manual. The following article describes the advantages of setting your external flash to manual. CLICK HERE.
ITEM (02/21/2019) Depth of Field Preview Button - Most DSLRs have a Depth of Field Preview button. Here is a link to a video that explains who it works. CLICK HERE.
ITEM (02/07/2019) Photo Contests. Here is an interesting article entitled 8 Great Reasons to enter a Photo Contest. With photo contests and gallery shows beginning another season, you'll find this article relevant. CLICK HERE.
ITEM (01/23/2019) Perspective. Here is an article that discusses basic perspective approaches to photography. CLICK HERE.
ITEM (01/17/2019) Avoiding blurry photos. Here is an article with suggestions on how to avoid blurry photos. CLICK HERE.
ITEM (12/30/2018) Copyrighting photo - This is a reminder to change any copyright messages that your camera might insert in the photo data, e.g., © 2019. If you have a photo web site, you'll want to update your copyright date there too.
ITEM (12/21/2018) How to deliver digital images to your clients. CLICK HERE
ITEM (11/04/2018) How to take better winter landscape photos. CLICK HERE.
ITEM (10/02/2018) What is EXIF Data? This is data filed in each photo containing the camera settings. Here is an article that explains it in detail. CLICK HERE.
ITEM (09/06/2018) - External light meter vs in camera meter. Here is an interesting explanation of the difference. CLICK HERE.
ITEM (09/04/2018) Want to take clear night photos of stars? Try following the rule of 500. CLICK HERE.
ITEM (08/16/2018) 7 Powerful Photography Tips video. CLICK HERE.
ITEM (07/27/2018) Viewfinder Image Blurry? You May
Need to Adjust Your Camera’s Diopter – Here’s How - CLICK HERE.
ITEM (06/28/2918) 23 Common Photography Abbreviations: Test your knowledge and see how many you know. CLICK HERE
ITEM (06/14/2018) How to photograph lightning. Two videos giving "how to do it" tips. CLICK HERE.
ITEM (06/09/2018) Explanation of depth-of-field. Video from B&H Photography explaining different approaches to depth-of-field. CLICK HERE.
ITEM (05/31/2018) Tips for using on-board and attached flash. CLICK HERE.
ITEM (05/31/2018) Pricing your photos. Here is an article discussing ways to determine how much to charge. CLICK HERE.
ITEM (05/31/2018) Posing Subject: This link provides 21 suggestions when posing a person for a photograph. CLICK HERE.
ITEM (05/12/2018 - Consent in Photography. Here are several links discussing the subject of your rights to photograph people.
Consenting - CLICK HERE
Legal Opinion - CLICK HERE
Legal Handbook for Photographers: The Rights and Liabilities of Making and Selling Images. Available on Amazon in book and Kindle format: CLICK HERE.
ITEM (04/20/2018) 20 Essential Photography Tips. We received an email from Tess Pajaron, Outreach Manager, Bob Books Ltd, London, England, providing a link to an article on their blog sites for beginner photographers. A lot of good advise. CLICK HERE.
ITEM (03/24/2018 - In the first photo, the contrast and sharpen sliders were pushed to an extreme. It looks like a photo of a galaxy. The second photo is the original photo. Experiment with your software for cool effects.


ITEM (03/08/2018) Raw Vs. JPEG. The following article discusses the pluses and minuses of shooting Raw or JPEG files. CLICK HERE.
ITEM (03/01/2018)
- Interior Real Estate Photography - Here is a link to a video describing ways to take interior photos. CLICK HERE.
- People Photography - Here is a web page containing three videos on how to take formal and informal portrait photos of people. CLICK HERE
ITEM: Here is an overview concerning tripods.
CLICK HERE At the January 2018 meeting, a discussion will include travel tripods. And as a reminder, if the camera is attached to the tripod, DON'T allow the legs to slide down freely and slam fully extended. Why? If they slam hard when extending, the impact may travel back to the camera and destroy the sensor - this happened to a member several years ago.
ITEM (12/21/2017) In preparation for our January and February meetings concerning HDR (High Dynamic Range), here is some important information.Bracketing captures three levels of exposure (three photos). Using software, all three photos can be combined to provide the best exposed. But most members don’t have the software to combine the three into one good exposure. So, here is a list of free and for a fee HDR software
- Aurora HDR 2018 - a paid version available for both windows and macs CLICK HERE
- Here is a web site with reviews on the above software CLICK HERE
- The following site provides reviews on 20 HDR software packages CLICK HERE
- For Canon users, you should be able to download “Digital Photo Professional 4” for either Mac or Windows. Under the Tools tab, you’ll see “Start HDR Tool” feature. You insert the three photos (under, over, and correct exposure) and the software will combine them.
- For general instruction on bracketing, view the following video: CLICK HERE
- Video for Lightroom for HDR: CLICK HERE
This video gets a bit complicated but you'll get the idea about bracketing: CLICK HERE.
ITEM (11/23/2017) Here is a refresher course for the Five Most Essential Camera Settings and How to Use Them. CLICK HERE.
ITEM (11/16/2017) How to shoot in manual mode. Here is an article with some helpful hints when trying to shoot in the manual mode. CLICK HERE.
Here is a second article which simply states that photography is a people business. That is, photography has a lot to do with how we interact with people. CLICK HERE.
ITEM (10/05/2017) Improve Your Street Photography article. Nice advice and in particular is item 5 which I never considered before but is great advice.
ITEM (09/25/2017) How to take high-speed photos without a high-speed camera. CLICK HERE.
ITEM (09/16/2017) Tips for Minimalist Photography- An article regarding mimimalist photos and negative space.
CLICK HERE
ITEM (08/26/2017) 7 hidden iPhone features.
CLICK HERE.
ITEM (08/23/2017) Aspect Ratio - Most cameras have a feature where you can set the size of your photo at the time you take your photo. Typical ratios are 4/3, 3/2, 1/1, 16/9, etc. In the day of film cameras, these ratios were used based upon the size print you wanted. For example,
Print Size Aspect Ratio
4x6 3:2
5x7 7:5
8x10 5:4
20x30 3:2
Today, internet consensus suggests that you set your camera to the ratio that captures the most of the picture and then later, using your computer, crop the photo to capture the story you want to tell. One camera might work best with a 3:2 ratio whereas another camera might capture more with a 4/3 ratio.
So, which aspect ratio in your camera captures the largest area? You need to experiment by placing your camera in one location and take a photo of the same scene for each aspect ratio provided by your camera. Then review the photos to see which ratio captures the most territory.
ITEM (08/16/2017) Free RAW/JPEG photo processing software packages. The following video reviews Photoscape X and Raw Therapee. CLICK HERE. For those who want to manage their Raw files without the expensive of buying software, these free packages might be a good alternative. No one fro our club has tested the software so you might want to conduct additional research into these packages before downloading them.
If you want a tutorial on Raw Therapee, CLICK HERE.
ITEM (08/23/2017) Have you ever put a filter on your lens and discovered you can't get if off? See Adam Savage try to remove a camera lens filter (using a band saw.) CLICK HERE.
ITEM (08/03/2017) PhotoShop Users: Adobe has launched a new Photoshop tutorial series for beginners on its YouTube channel, titled "3, 2, 1... Photoshop!" CLICK HERE.
ITEM (08/02/2017) Things to Consider Regarding a Mirrorless System. CLICK HERE.
ITEM (07/26/2017) Should you use a protective filter? A discussion on whether you should have a protective filter on your lens or not. CLICK HERE.
ITEM (07/25/2017) Free video series on basic Photoshop. This Youtube series consists of 33 videos explaining the basic applications in Photoshop.
CLICK HERE.
ITEM (07/13/2017) Adding text into the photo file. Did you know that you can add text inside your photo file that provides information you want to keep with the photo for future reference, e.g., who is in the photo or where you took the photo. For general instructions, CLICK HERE.
Here is an example of a photo in a Mac computer. Highlight the photo file with the right mouse button and click on "Get Info". Scroll down to comments and add text.

ITEM (07/11/2017) Photographing an eclipse. Here is an article providing tips on photographing the upcoming solar eclipse. CLICK HERE.
ITEM (07/06/2017) How to sell your photos: The following article discusses how one photographer earns money by selling his photos. CLICK HERE.
ITEM (07/05/2017) - 10 Important Tips for Purchasing a Used Camera. CLICK HERE.
ITEM (06/29/2017) Video showing 10 Photography tricks.
Click Here.
ITEM (06/15/2017) Your cell phone can help with night photography. Here is an article that provides some tips on using your smart phone's flash light to enhance night photography. CLICK HERE.
ITEM (05/29/2017) Here is a video describing the positive and negative issues when using a polarizing filter. CLICK HERE
ITEM (05/26/2017) Recently buy an Apple Computer and shoot in RAW format? You can open RAW files using Preview but you can't change anything unless you first export as a TIFF or JPEG. There is a third-party application available at the Apple Store called RAW Power. It unlocks the power of Apple's RAW engine with simple, easy-to-use controls. Use it as an editing extension inside Apple Photos, or as a standalone, non-destructive RAW photo editor. To buy application, CLICK HERE. To visit the company's web site with photos of the software, CLICK HERE.
05/25/2017 Understand Your Camera’s Light Meter and Get the Exposure You Want Article. CLICK HERE
05/23/2017 Negative Space - Here are several articles describing negative space with examples.
1-CLICK HERE
2-CLICK HERE
3-CLICK HERE
4-CLICK HERE
05/11/2017 National Geographic photographer Bob Holmes provides lighting tips and the secrets for controlling light in photographs. You'll learn about the 3 types of light and how to control each. CLICK HERE
05/10/2017 - DSLR vs Mirrorless camera. The following article provides a comparison between dslr and mirrorless cameras. CLICK HERE.
And here is a link to an assortment of videos providing tips for photography from famous photographers. CLICK HERE.
05/07/2017 - Photo Paper:
- Cast Coated Receiving Layer – Commonly found in the budget and “Every Day” range. It provides satisfactory results, but often may appear slightly duller than the Micro Porous. Because there is no barrier coating on the paper, ink sinks deeper into the product and will fade quicker with time. Cast coated paper is instant dry, but if pigmented inks are used (especially black), may be susceptible to some smearing. Cast Coatings have limited archival properties.
- Micro and Nano Pores Receiving Layers – Professional and high-end range paper. The ink sits within nanoscopic pores in the chemical so it dries instantly and the archival potential is much improved. It is the receiving layer choice of most photographers.
05/03/2017 - Five Composition Techniques to improve your photography. CLICK HERE.
04/24/2017 - Checklist – 7 Prompts to Help you Pause and Take Better Photos. CLICK HERE.
04/09/2017 - Taking long exposure in daylight - a video that explains how to do it. CLICK HERE.03/29/2017 - "When Learning to Shoot in Black and White, You Can’t Just Guess." This is a good article when considering photographing in black and white. CLICK HERE.
03/12/2017 - Lens Diffraction In Photography - Here is a nice video explaining the problems when you set a small aperture size, e.g., F-22 and the way it affects the sharpness of your photo. CLICK HERE.
03/02/2017 - A Photographer’s Shutter Speed Cheat Sheet as a Handy Reference.This article also provides advice regarding the balance between shutter speed and exposure.
CLICK HERE
02/23/2017 - Getting Sharper Photos - Here are 4 tips on getting sharper photos. Suggestions 1 through 3 are common sense ideas. The 4th suggestion will take some effort but in the long-run, may help a lot. CLICK HERE.
02/10/2017 - Light Meter. Here is a link to a Youtube video explaining the light metering modes that most cameras have. Choosing the right mode can help get the shot you want where lighting conditions have sharp contrasts. CLICK HERE.
Here is an article from B&H Photo - CLICK HERE.
02/09/2017 Nikon Camera Owners - Nikon has a series of classes available around the country. They will be holding a class in Chantilly, VA March 11. For online Nikon classes, CLICK HERE.
For Sony cameras CLICK HERE.
Olympus Cameras: CLICK HERE.
02/09/2017 5 Tips to get sharp photos using tripod. CLICK HERE.
12/17/2016 - Painting with Light.
Set up your camera on a tripod, set the shutter for around 20 seconds, F22, ISO 100 and manual focus (and focus on the person holding the light), and have one of your kids wave a light to make different shapes. Here is an example:

12/11/2016 - Easy way to grasp the concept of the F-Stop.
At the November club meeting, Joe Laughland discussed the F-stop (a measurement of the size opening of the aperture). He explained that if you think of the F-stop number as a fraction or a part of a delicious cherry pie, it is easier to understand. E.g, The number 1 represents the largest potential opening (the entire pie). The F-stop number is a fraction of 1. E.g., F1.4 would be 1/14 of the pie. F-22 would be 1/220 of the pie (obviously a lot less pie - or in our case, a lot less light getting to the sensor.) As you change your F-stop, you'll be getting either more or less of the pie (light). So, think of the F-stop as a fraction of 1.
11/20/2016 - Visual Chart - The following chart should help beginning photographers in understanding shutter, aperture, and ISO. As the F-stop number increases, the depth of field (what is in focus in front and behind the subject) increases. As the shutter slows down, the subject becomes more blurred. When the ISO number increases, the photo will become more grainy.

11/15/2016 -Micro adjusting your lens to your camera.Most mid- and high-level cameras have in-camera adjustments to ensure that the lens will correctly focus on your subject. In general, you focus on an object with fine detail and take a photo. If it appears that the foreground and background is in focus rather than the targeted subject, then you may need to adjust the lens using the in-camera application.
The following are links for several different manufactures and a list of cameras that should have in-camera adjustment ability.
Canon - CLICK HERE
Video that explains this process: CLICK HERE
Canon: AF MicroAdjustment
1Dx, 1Dx Mk2, 5D Mk3, 5D Mk4, 5Ds, 5Ds R, 6D, 7D MkII, 1D Mk3, 1D Mk4, 1Ds Mk3, 5D Mk2, 7D, 50D, 70D, 80D
Nikon (AF Fine Tune)
D4, D4s, D5, D3, D3x, D3s, D300, D300s, D500, D600, D610, D700, D750, D800 (/E), D810, D7000, D7100, D7200,
Sony: AF Micro Adjustment
A900, A850, A6000, SLT-A77, SLT-A77 MkII, SLT-99
Olympus: AF Focus Adjust
Note: Olympus cameras facilitate independant adjustment of the short and long end of zoom lenses.
E-30, E-620, E-5, E-M1 (only when used with 4/3 lens adapter)
Pentax: AF Fine Adjustment
K20D, K2000, K200D, K-3 series, K-5, K-5 II, K-5 IIs, K7D, 645D, 645Z
11/10/2016 Backlighting.
Backlight is essentially what it sounds like: light that comes from behind the subject. It is primarily light that is directed toward the camera's position, but blocked by the subject. This creates a glow that is variable for the subject. Backlight can be created artificially with a studio or light kit, and can also be harnessed in a natural environment by positioning the subject in relation to natural light sources. You are likely going to want to use a reflected light meter in these situations.
Backlighting Tips
You are going to have to go with your instincts usually when trying to position the backlight effectively. For example, a natural light source like a window can be useful if it is not too large. If it is too large then you will end up seeing that the brightness of an open window source can blow out the image if it stays in the frame.
When outside you will usually want the subject to block the sun directly. This way it will be an effective backlight while also keeping the sun out of the subject’s eyes. If it is really bright then you may want to avoid this and instead go for using a reflector both on the spot and the backlight.
Here are two short videos that give some great tips on creating backlit photos:
CLICK HERE #1
CLICK HERE #2
CLICK HERE #3
10/28/2016 - Here is a link to a thorough discussion on street photography. Here is an outline of the discussion:
- What is street photography?
- Ethics and overcoming your fear.
- The law and street photography.
- A few of the most important tips to get you started.
- Equipment.
- Camera settings.
- Composition and light.
- Advanced tips.
- Content and concepts of street photography.
- Editing.
- Master street photographer research.
10/19/2016 - Here is a link with suggestions for taking photos of the fall colors. One tip that seems to work all the time is to slightly underexpose. CLICK HERE.
10/15/2016 - DSLR or Mirrorless? Which Camera Is Right for You? Here is a video that explains the difference.
10/11/2016 - How To Take Pictures Of Mist And Fog - CLICK HERE.
09/18/2016 - How lenses work - A short Canon video that explains lenses. CLICK HERE
08/02/2016 - Photo Quiz. Here is a link to a 22 question quiz which can challenge both new and experienced photographers. See how you do. CLICK HERE.
07/21/2016 - 5 Tips for Setting the Focus in Your Landscape Photography. This is an interesting article that's worth reading. CLICK HERE.
07/07/2016 Multiple Exposures. Some new cameras now provide the ability to make multiple exposures within the camera. The following comes from a Canon 80D. You can take up to 9 shots. After each shot, the Lego car is moved forward. After taking the shots, the camera stitches the photos together. This allows some trick photography. The Lego Photo is a combination of 6 shots.


6/02/2016 - Camera Settings: Remember to reset your camera settings after each photo event. Return the settings to something that is neutral. E.g., if you had been shooting an ISO of 2,000, return it to 100. If you had an aperture of F22, return it to around F5. Return your shutter speed from the 2,500 to around 100. And finally, reset your White Balance to auto.
WHY? When you grab your camera next time for a quick shot, the settings won't be so extreme as to make the photo worthless.
5/20/2016 - Improving sharpness. We all know the techniques to improve sharpness: Image stabilization, tripod, faster shutter speed, and using the lowest ISO setting as possible. Another way to improve sharpness (by avoiding shake) is to set up your camera for the shot and then use the "live view" feature where you see the subject using the LCD screen rather than the view finder. This feature locks the mirror up and out of the way and avoids shaking caused by the mirror lifting out of the way.
5/19/2016 - What is HDR? Wonder what exactly is HDR (high dynamic range). To find out, read this article - CLICK HERE.
4/19/2016 - Dirty Sensor. The other day, I took photos of the sky and a jet trail but found some small spots on the photo. I switched lenses and found that the spots still appeared on my photos which indicated that my sensor was dirty. Although sensor cleaning kits are available on the Internet from $35 to $50, I took my camera (Canon 60D) to Glen's Fair Price Store (Website) for cleaning - it cost $25. This is probably the most economical way of refreshing a DSLR. So, check out your photos and see if your sensor is dirty. Joe Laughland
The arrows are pointing to some of the obvious spots that were on my sensor. Can you see some of the other spots?

3/31/2016 - 5 Uncomfortable Truths About Photography. Here is an interesting article that you might find educational. CLICK HERE
03/03/2016 - Memory Cards - Information you need about memory cards - They are not all equal. CLICK HERE.
02/13/2016 - How the Focussing System on Your Camera Works. CLICK HERE.
02/03/2016 - 4 Things To Consider Before Uploading Photos Online. CLICK HERE to read an interesting article on this topic.
01/27/2016 - Do you know what the Acronyms and Markings on Your Camera Lens Mean? CLICK HERE to see explanations.
01/22/2016 - Photographing Snow - We're expecting 2+ feet of snow this weekend so let's get out there and capture snow scenes. 1. Set ISO at 100-200
2. Set white balance on shade.
3. Exposure compensation should be set at +1 or +1.3
Here are links to web sites and videos that provide tips on snow photography.
* CLICK HERE
* CLICK HERE
* CLICK HERE
Videos
* CLICK HERE
* CLICK HERE
There are tons of other sites and videos on the web.
01/21/2016 - Using a Grey Card to get the right white balance. Here is an article about using the grey card to set your white balance. CLICK HERE.
01/19/2016 - ISO - A Beginners Guide. For a basic explanation of ISO, CLICK HERE.
01/14/2016 - Histograms for Beginners. An article found at
Digital Photography School. Click Here.
12/22/2015 - Holiday Photos Checklist - Contains a list of actions in preparing for those holiday photo opportunities. CLICK HERE.
12/14/2015 - Sunrise and Sunset Forecast models you can use to see if there will be a beautiful sunrise or sunset you your area. CLICK HERE.
Updated: 12/11/2015 Check List - Before you leave home for your next photo shoot, you want to reset your menus to something neutral. Here is a list of the most common settings that you should check.

11/24/2015 - Memory Cards.
Visit the following web site for an explanation on memory cards for your camera. CLICK HERE. One important point - some of the newer cards may not work on older cameras. Look at your manual to see what it recommends.
Click on the following link to see an interesting video explaining the shutter function. CLICK HERE.
11/06/2015 - Copyright Issues
You know that by photographing something, you automatically have the copyright. What you may not know is that if you don’t register your copyright with the copyright office, you can’t
- file a lawsuit in Federal court,
- collect compensatory or statutory damages,
- recover attorney fees,
- get an injunction, and
- assume that you have the copyright (you have to be able to prove that you created it.)
Here is a link to a B&H video on copyright issues for photographers. Although it a long video (one hour and 35 minutes) you should view the entire video. CLICK HERE.
To visit the Copyright office, CLICK HERE.
For a PDF tutorial on registering electronically, CLICK HERE.
11/05/2015 - An interesting short Canon video and what it says about the photographer.
11/03/2015 - Here is a link to a simple and easy explanation to the basic camera settings found on most cameras. CLICK HERE.
10/10/2015 - What is the difference between JPG and RAW format? Click Here to read about the differences.
 Digital Photography Tips and Tutorials for Beginners - Click Here.
Article about third-party lenses. Click Here.
Digital Photography Tips and Tutorials for Beginners - Click Here.
Article about third-party lenses. Click Here.
05/27/2015 - Here are two interesting articles for your information.
04/17/2015 TIP: Here is a link for improving the sharpness of your photos. CLICK HERE.
02/26/2015
(09/10/2014) Here is an example from Joe Laughland of overexposing the background. F2, 1/320
shutter, ISO 200, 28mm lens. The second photo (F10, 1/160, ISO 200) is what the scene
looks like under normal settings.


10/10/2015 - What is the difference between JPG and RAW format? Click Here to read about the differences.
Focus Point Controls: Most cameras have a menu selection in which control of what to focus upon can be given to the camera or to the photographer.
- Auto Select: In the slide below, the top auto focus selection menu can provide multiple points to automatically focus upon. The more expensive the camera, the more points it provides.
- Manual Select: The lower manual focus selection menu allows you to select just one point to focus upon.
(Slide created by Joe Laughland)

07/19/2015 - Here are two interesting articles for your information.
- Did you know that most DSLRs have a menu item that can tell you that your battery is low and its condition? Here is a Canon 60D showing that the power is down 77% after 24 shots have been made, but that the recharge performance is low. Does this mean its time to replace the battery? Not exactly. You can keep shooting but understand that the battery may fail in the near future.
In most cases, the camera may not be
able to accurate tell how much power or the condition of the generic
battery if it doesn't have a computer chip to relay such information to
the camera.
 35 Photography Links to Blow Your Socks Off - Click Here.
- 7 Powerful Photography Tips for Amazing Photos Click Here.

- Depth of Field video which explains the three factors/settings that impact depth of field. Click Here.
- To understand how Focal Length Affects Your Background, Click Here to watch an informative video.
- Thinking of getting an external light meter? Here is a video that fully explains how and why to use an external light meter. Click Here.
- Here is a set of instructions for creating black backgrounds, even in daylight!
- Turn your camera to manual mode and grab a flash
- Set the shutter speed at 1/200 (flash sync speed), and your ISO as low as it can go (usually ISO 100)
- Adjust your aperture up until the picture is completely black. This will usually be around f/18 or f/22
- Use a flash on FULL POWER (you might need two flashes if it’s very bright outside). Don’t worry about the flash appearing too bright in the photo. One you adjust your aperture to compensate for the bright flash, it will look great
- Snap the picture. You can adjust the aperture until the brightness on the model looks right
- Want to understand how the shutter works? Here is a link to a video explaining shutters. The first half of the video is all you need to watch. Click Here.
05/27/2015 - Here are two interesting articles for your information.
- An interesting article about fake Nikon cameras. Click Here.
- Here is a link to an informative discussion concerning camera sensor sizes and their impact on your photography. Click Here.
04/17/2015 TIP: Here is a link for improving the sharpness of your photos. CLICK HERE.
03/12/2015 Item: Have your photo put on glass: Visit Fractureme.com
02/26/2015
HOT TIP: Photographing in the snow:
1. Set ISO at 100-200
2. Set white balance on shade.
3. Exposure compensation should be set at +1 or +1.3
If sun is shining, use a polarizing filer to enhance blues skies and white snow.
Other Tips:
- Video on diffraction affect and how to avoid it - said another way, how to get sharper photos.
Here is a good list of suggestions for landscape photography: Click Here.
When using a tripod - remember to turn of the Image Stabilization feature to improve photo quality.
- For a night shot using automatic focus, focus on the edge of the bright point. The camera will use the contrast between the very light and the very dark tones to focus.
- For a night shot using automatic focus, focus on the edge of the bright point. The camera will use the contrast between the very light and the very dark tones to focus.
- The top 3 countries where cameras are stolen are USA, UK and Italy.
Top stolen Canon: Mark III, Mark II and 60D
Top stolen Nikon: D700, D800, and DS100 - Where gear gets stolen by percentage:
27 auto
24 burglary
9 public
9 robbery
7 lost
5 airport/airplane
5 bar/restaurant
3 package theft
3 Hotel
1 fraud
(11/28/2014)
When using a tripod, always extend the legs out first before raising the camera using the center pole because the center pole reduces the stability of the tripod.
(03/08/2015) Avoiding blurred pictures:
A traditional rule when hand-holding your camera and to avoid blur caused by camera shake – your shutter speed should be the reciprocal of your lens’ focal length – that is, if you’re using a 60mm lens, your exposure should be 1/60th of a second or faster. With a 200mm lens, use at least 1/200th of a second, and so on.
UPDATE: Recently, that rule has changed, suggesting that your shutter speed should be twice the aperture number. E.g., at 60mm, the shutter speed should be no slower than 1/120 (60x2=120). This is particularly important to cropped sensors - which is what most basic and mid-range cameras have.
(09/15/2014)
Inserting "©" copyright symbol on your photos
Software used to modify photos usually contain a feature to add text to a photo. When wanting to post a copyright symbol with the date and your name, you will want to use one of these instructions to insert the © symbol.
- For a Microsoft Windows, hold down the Alt key and type "0169" using the keypad.
- For MS laptops or notebooks without a keypad, a
"function" key must be pressed to access the number keys. E.g., press "alt" then the key required to access the numbers, and
then 0169.
- For the Mac, hold down the "option" key and press the letter "g".
- For html, the symbol code for the copyright symbol © on HTML is "©".
It usually refers to a fixed lens that
doesn't have a zoom feature. An example would be a Canon 28mm, 1.8
f-stop lens. Although you can't zoom into a subject with a prime lens,
it does offer superior optical quality, larger maximum aperture,
lighter weight, fewer moving parts, and smaller size. The lower the f
stop, however, the higher the cost (more glass).
(09/12/2014) Joe Laughland put together two training videos explaining how to use Apples' Preview software:
Video 1: How to use the "Adjust Color" tools to change the look of a photo. CLICK HERE to see the video.
Video 2:
How to add text to a digital photo.
How to add text to a PDF file so you can complete a form with nice text.
How to remove surrounding parts of a photo to make it transparent and to place photo onto another photo.
CLICK HERE to see the video.
(09/10/2014) Here is an example from Joe Laughland of overexposing the background. F2, 1/320
shutter, ISO 200, 28mm lens. The second photo (F10, 1/160, ISO 200) is what the scene
looks like under normal settings.
(08/27/2014) Lightroom - A number of members have asked about instructions on Lightroom. The following links may be of help for those who are new or basic users of Lightroom.
Link - This link is one I found on Youtube.
The club does not warrant or support or endorse any information provided by these external sources.
(08/21/2014) 7 Tips to Create More Powerful Images
(07/17/2014) HISTOGRAM - A member recently asked about the histogram feature in her camera. Here is a video that explains the histogram.
(07/10/2014) DID YOU KNOW -
The expected lifespan of a mechanical hard drive is three to five years. After five years, you shouldn't trust the hard drive with critical data. So, if you are using a hard drive that is reaching 5 years old, you might consider buying and storing your pictures to a new hard drive.
- Sharpening your photo with software should be the last step after you have sized the image to your final print size. If you sharpen your image and then resize them, it will negatively affect the quality of your photo.
(06/18/2014) Exposure Compensation. Here are two videos that explain exposure compensation:
(06/14/2014) Photo Tips from Nikon
The Nikon web site provides instructions and hints on taking great photographs called "Learn and Explore." CLICK HERE
<><><><><><><><>
(06/11/2014) In April, the club visited WMRA to see the photos of professional photographer Pat Jarrett. One picture demonstrated a technique of over exposing the background. We found the photo on the Intranet and can be viewed at the following: Click Here
<><><><><><><><>
(05/02/2014) SQUINCHING
A simple technique for improving portrait shots.
JAW LINE
A technique for improving the overall look for portrait shots.
(04/28/2014) Photo Tip:
When using ISO, higher ISO not only increases the noise level but also decreases the dynamic range. For each step up in ISO, there will be a discernible drop in the dynamic range of in the image. In low light conditions, it is better to use a tripod and low shutter speed than hand holding at higher ISO.
(03/29/2014) Evaluating your shot
After you get home, it helps to see the settings used to get that perfect picture as a guide for future photo events. You can use the Mac "Preview" program to get some picture stats. Highlight the photo and press the "Info" icon, to see the camera settings.

As you can see, the photo of the South Dakota badlands had a focal length of 135mm (maximum telephoto for this lens), F stop of 10, with a shutter speed of 1/640.
To get even more data, you can use Canon's Digital Photo Professional software which is available for free download. Here are the stats for the same picture using Canon's software. The ISO was 200, white balance was on auto.

I suspect you can use this software for pictures taken with other brand cameras. Or, for other brands of cameras, check their company web sites for free photo software too.
SPECIAL NOTE: Oooops. Notice that the copyright notice is 2012 but the picture was taken in 2013. If you can embed copyright information, be sure to keep it up to date.

<><><><><><><><><>
(03/02/2014) Sunny 16 RuleDuring the film days of photography, there was the “sunny 16 rule” (also known as the sunny f/16 rule) which estimated the correct daylight exposures without a light meter. The rule is based on incident light, rather than reflected light as with most camera light meters. The rule is, "Set aperture to f/16 and set shutter speed to the ISO film speed for a subject in direct sunlight."
- On a sunny day with ISO 100 and aperture to f/16, set shutter speed to 1/100.
- On a sunny day with ISO 200 and aperture at f/16, set shutter speed to 1/200.
- On a sunny day with ISO 400 and aperture at f/16, set shutter speed to 1/400.
Shutter
speed can be changed as long as the f-number is altered to compensate,
e.g. 1/250 speed at f/11 is similar to 1/125 speed at f/16.
Aperture Lighting conditions Shadow detail
f/22 Snow/sand Dark with sharp edges
f/16 Sunny Distinct
f/11 Slight overcast Soft around edges
f/8 Overcast Barely visible
f/5.6 Heavy overcast No shadows
f/4 Open shade/sunset No shadows
<><><><><><><><><><><><>
(02/28/2014) Circle of Confusion - What is the Circle of Confusion and why is it used in Depth of Field tables? This video offers a clear and simple visual explanation. Click Here.
If you can't justify the cost of a light meter and want better pictures using your camera's exposure meter, buy a grey card. An 18% grey card provides the same grey tone that the camera's meter scrambles to. Taking a meter reading from a grey card placed in front of the subject will give a similar exposure to an incident meter reading.
(02/06/2014) - Shutter Speed Tip.
If you’re using a 18-135mm lens and you set your lens to 135mm, then you need a shutter speed of at least 1/135th second. If you zoom out to 18mm then you’d need a shutter speed of 1/18th second.
<><><><><><><><><><><><><><><><><>
(01/02/2014) 21 Settings, Techniques, and Rules all new Camera owners should know.Visit the following web site for an explanation of the 21 settings you should learn.
http://digital-photography-school.com/21-settings-techniques-and-rules-all-new-camera-owners-should-know
(12/15/13) Advice on buying Point-and-Shoot camera.
When buying a point-and-shoot camera for taking indoor photos, one item to consider is how big is the aperture. You can determine this by looking at the front lens of the camera and look for an aperture setting with a low number, e.g. F1.8, which is about the largest aperture you can get in a point-and-shoot camera. See the following picture. You will see something like, 1:1.8.

Here is a list of cameras that come with 1.8 aperture settings.
- Canon Powershot G16, Canon Powershot S120
- Nikon Coolpix P300, P310, P330
- Olympus XZ-1, Olympus Stylus XZ-2, Olympus Stylus XZ-10
- Samsung TL500
- Sony Cyber-shot RX100 II
(12/9/13) Depth of Field Calculator (DOF):
Here is a screen shot of a DOF located on the Internet.

(1/1/13) CNET web site had a short tutorial which should be of interest to new photographers. Click Here.
(4/25/13)
Want to photograph a star field where you take a bunch of pictures of the night sky and blend them to make star streaks?
Well, you can use Photoshop or use a free program called StarStaX. It is available for both Windows and Macs. It is a fast multi-platform image stacking and blending software, which allows the merging of a series of photos into a single image using different blending modes. It is developed primarily for star trail photography where the relative motion of the stars in consecutive images creates structures looking like star trails. Besides star trails, it can be of great use in more general image blending tasks, such as noise reduction or synthetic exposure enlargement. To see a video of how the software works verses Photoshop, CLICK HERE.

<><><><><><><><><><><><>
Macro PhotographyHere are some additional tips found on the Internet:
- “Macro” is when you increase the object’s size in your picture from about half life-size to five times life-size.
- Use an f-stop no wider/larger than f/16 to get all or most of the main subject in focus. But you can experiment with wider/larger lens apertures to put part of the subject out of focus to produce pleasing artistic effects.
- Shoot the subject from an unexpected angle.
- Choose a simple background to keep focus on the main subject.
- If shooting outside, a breeze can be a challenge. Stop or reduce unwanted motion by planting a stick in the ground and tether the subject for stability. Use the fastest shutter speed possible.
- A camera’s built-in pop-up flash usually will cause a shadow from the camera’s flash. If possible, use a reflective board to redirect the natural light.
- When shooting macros, imperfections become more noticeable and can end up distracting the viewer or spoil what could be an excellent shot. Take the time to exam your subject carefully to ensure the shot will be great.
- Morning light helps to backlight subjects, giving objects some translucent effects.
- To shoot potentially moving objects, e.g., insects, pre-focus the lens. Find something that's of a similar size and distance to the subject to set up the camera.
<><><><><><><><><><><><><><><><><>
GIMP - Free - Photo/Image Adjustment SoftwareGIMP is an acronym for GNU Image Manipulation Program. It is a freely distributed program for such tasks as photo retouching, image composition and image authoring.
It has many capabilities. It can be used as a simple paint program, an expert quality photo retouching program, an online batch processing system, a mass production image renderer, an image format converter, etc.
GIMP is expandable and extensible. It is designed to be augmented with plug-ins and extensions to do just about anything. The advanced scripting interface allows everything from the simplest task to the most complex image manipulation procedures to be easily scripted.
GIMP appears to be for Linux and Mac systems but there is a downlink for Windows. It is a free alternative to Photo Shop.
To visit GIMP's website, Click Here.

Do You Need a Polarizer Filter?
The following information came from the following site: http://chrismarquardt.com/faq.htm
Under certain circumstances a polarizer can be a great help. If you shoot a lot in very bright conditions, getting an ND filter might be advised (if you know what you need it for). If you shoot a lot of landscapes, an ND Grad filter can be of great value.
You should only use filters if you really really need them though.
Reflections. Everything that sits in the light path will contribute something to the picture, be it in a positive or in a negative way. If you put a $50 protective filter (substitute UV filter, Skylight filter, Haze filter, etc.) in front of your $900 lens, each and every single one of your pictures will be degraded thanks to reflections that the filters produce between themselves and the front element of the lens. Every year around Christmas time I receive requests from people who can't understand why their shots of the Christmas tree with all its lights look so weird. What they experience is ghosting: reflections off of filters that create ghost images.
Scratch protection? Using a filter for scratch protection is so deeply engrained in many people's minds that they don't even question it anymore. Which turns it into a really easy sell for every camera salesman. They really love selling you protective filters. "You obviously don't want to buy a lens without a protective filter, right? One little scratch and your investment will be down the drain." Well, not so far. The answer is actually simple: don't spoil the majority of your pictures while you could get the same or an even better level of protection using a lens hood. That's right, there are many reasons to get a lens hood, and one is that it will give your lens protection from bumps. The other reason for a using a lens hood is that it which will increase the overall contrast and clarity of each and every picture you take.
Color correction? These are a staple of film photography. We don't need color correction filters with digital photography. All color correction can be done in post processing or by setting the proper white balance before the shot.
Effect filters? Today star effects, cross filter effects, diffusion filter effects etc. can be much more effectively produced during post processing. There's no undo if you shoot with a filter and you get it wrong.
So what filters are okay? The few reasons where I agree with using filters are these:
- a few Canon L lenses require a filter to complete the weather sealing.
- the ND grad filter will help you control dynamics in certain scenes
- the ND filter will help you shoot very bright scenes at wider open apertures
- the polarizer lets you control non-metallic reflections, increase color saturation and contrast and get darker blue skies (but take it off indoors, as it also steals some light)
- some specialized filters will allow you to do things that would be hard to do any other way in a single shot (example: split diopter)
<><><><><><><><><><><><><><><><><>
Saving Digital Photos:At some point, you need to transfer your digital photos from the camera to a computer hard drive. Understand, however, that hard drives eventually die and usually without warning. So, you need to save your photos to a backup storage device too. Here are the type of storage devices you should consider:
- The best alternative is using a thumb/USB drive. Capacities have grown to 32 and 64 gigabytes making them an affordable alternative for storing photos. Also, thumb/USB drives are the most reliable storage devices.
- SD cards (the kind you use in a camera) can also be used as a storage device, although they cost more than a thumb/USB drive.
- Another alternative is DVD disk. Understand, however, that DVDs, even the best quality, have a limited life too.
- The least alternative is the cloud (remote storage using Internet) because of several issues. You need fast Internet speed to upload. Most sites charge for storage above 2 gigabytes, and some companies have gone out of business causing photos to be lost. Some applications compress the photo file for uploading so some quality is lost if downloaded for printing.
<><><><><><><><><><><><><><><><><>
Black and white photography:Click on the following links for tips on shooting black and white photos
- Five tips for black & white photos
- More tips
- 15 tips
- More more tips
- Basics (video)
- More advice (video)
<><><><><><><><><><><><><><><><><>
Taking Night Sky Shots:- Cloudless sky (well, of course)
- Ideally away from city lights (to avoid light pollution and flare)
- Tripod
- Wide angle (ideally f2.8 or faster) If you're shooting lightning, you probably want f18 or higher because of depth of field issues.
- Use a remote trigger with mirror lock to reduce camera shake or use timer on camera
- Ideally shoot in raw format for better quality
- Noise reduction off (if shooting raw) to save time
- Manual focus to infinity
- ISO 1600 to 3200 (or more if your camera can handle)
- Exposure 10 to 30 seconds (longer exposures will start to show stars as trails rather than dots)
- Shoot in Aperture priority (Av on the mode dial)
- Set the Aperture to f/8 (rotate the command dial)
- Change the metering mode to Spot metering
- Set your ISO to 100
- Mount camera on a tripod
- Enable the self-timer to get your hands off the camera and eliminate any chance of camera shake affecting the sharpness of your shot
Astrophotography
<><><><><><><><><><><><><><><><><>
Time Lapse Photography: Here are two articles worth reading concerning time lapse photography.
Click Here.
Click Here. Digital Photography School
Here is an example created by Joe. Click Here
The photos were loaded into iMovie and each photo was made 3/30th of a second long. It took about 230 pictures to make a 47- seconds movie.
Click Here.
Click Here. Digital Photography School
Here is an example created by Joe. Click Here
The photos were loaded into iMovie and each photo was made 3/30th of a second long. It took about 230 pictures to make a 47- seconds movie.
<><><><><><><><><><><><><><><><><>
Training Site: Here is another site that explains photography. Click Here.
<><><><><><><><><><><><><><><><><>
Exposure: Here are two websites as follow-up information on the use of exposure compensation to improve the lighting in your photos:
Club member Joe has put together a PDF
document which explains where you find the Exposure Meter and how to
influence it controls. To view the document, CLICK HERE.

<><><><><><><><><><><><><><><><><>
<><><><><><><><><><><><><><><><><>
RULES: Have you noticed that
whenever you read about the rule of thirds and other principles of
photography, that at the end of the article, there is the caveat that
says that you can break these rules.Calling different modes of composition "rules" actually does a disservice to the new photographer. New photographers may confine their photography to these "rules." I suggest replacing the word "rules" with "starting points." Starting points suggests ways to look at a potential picture and then to let the picture drive the composition and letting you decide on what story is to be told.
Start with the rule of thirds and then decide if the picture is worth $200 to print and frame. Does the shot knock your socks off? Does it tell the story that you want to tell? Take all of the photo advice and think of them as "starting points." Use the starting point to set up the shot but then use your eye to really find the picture worth taking. Joe
<><><><><><><><><><><><><><><><><>
Definitions:
- Photography Workshop: An educational experience to help you improve your craft. A workshop is design to teach you new techniques in the field, teach you new techniques in a studio or teach you post-production and business skills.
- Photo Tour: Take you to a great location at the best time of year and get you to the right places for the best light. A photo tour is designed to maximize the photographic opportunities with minimal or casual instruction along the way. Read more: http://digital-photography-school.com/taking-a-photography-workshop-why-it-is-different-from-a-photo-tour#ixzz21klAP7yg
<><><><><><><><><><><><><><><><><>
Photography Tips:
- Taking pictures when inside a museum. Click Here
- Digital Photography Tips for Beginners, Click Here.
<><><><><><><><><><><><><><><><><>
Data Storage:Digital cameras have several types of storage devices, e.g., Compact Flash, Standard Digital (SD Card), or proprietary (Sony Memory Stick). When buying a new card, insert it into your camera. Locate and use the camera's format feature to format the card. This will ensure that the card and camera can talk to each other.
Every so often, you should reformat your card because these cards can develop anomalies (errors) that may eventually cause problems in reading files. So, at some point when you've transferred all your files to a computer or other storage device, reformat your card using the camera's format feature.
WARNING: When you format a card, it erases everything on the card. Make sure you have saved your pictures to a computer, etc.


NOTE:
Current SD cards are classified as either Class 2, 4, 6, or 10. The
higher the number, the faster the card will read or write data. This
can be important if your camera takes large pictures or videos. When
buying a new SD card, I would recommend a minimum of an SDHC Class 6 or
Class 10 card. If you plan to take video, I would recommend Class 10.
There is a new card classification called a SD UHC 1 which is the state
of the art card but is currently the most expensive.